

Table of Contents
In today’s fast-paced business environment, field service management software plays a crucial role in ensuring smooth operations for businesses that rely on a mobile workforce. One of the essential components of such software is route optimization, which involves finding the most efficient paths for service technicians to travel between multiple service locations. By minimizing travel time, reducing costs, and enhancing customer satisfaction, efficient routing has become a vital aspect of field service management.
Field service businesses often encounter several challenges in managing multiple service requests and scheduling routes, including:
- Complex Scheduling: Coordinating numerous service requests while considering factors such as technician availability, skills, and service priorities.
- Dynamic Changes: Handling unforeseen changes, such as cancellations, rescheduling, or emergency service calls, and adapting schedules accordingly.
- Travel Efficiency: Ensuring technicians take the most optimized routes to minimize travel time, fuel consumption, and vehicle wear and tear.
- Resource Allocation: Efficiently assigning technicians and resources based on location, expertise, and availability to meet service demands.
- Customer Expectations: Meeting customer expectations by providing prompt and reliable service, accurate arrival time estimates and minimal waiting times.
Route optimization plays a crucial role in addressing the challenges faced by field service businesses. Nextbillion.ai’s Route Optimization API stands out as an efficient tool designed to address the Multi or Single Vehicle Routing Problem (VRP). This classic optimization problem in operations research involves determining the optimal routes for a fleet of vehicles to visit a set of locations while considering constraints such as time windows, capacity and vehicle availability.
Features and Capabilities of the Route Optimization API
The Route Optimization API from Nextbillion.ai comprise two main components: the input data and the optimization engine.
The input data consists of vital information such as job details (stops/places to visit), vehicle specifications (delivery trucks, vans, etc.), and shipments (pickup and delivery tasks). The optimization engine utilizes this data to generate the most efficient set of routes for the vehicles.
The API offers two key components for integration:
- Optimization Post: This method allows users to submit the necessary input data for the VRP. By providing information about jobs, vehicles, and shipments, businesses can initiate the optimization process and set the foundation for generating efficient routes.
- Optimization GET: With this method, users can retrieve the status of a submitted VRP using a unique reference ID. It enables businesses to monitor the progress of route optimization, ensuring transparency and control throughout the process.
With the Route Optimization API, businesses can streamline their delivery processes, save time and reduce costs. The API’s advanced capabilities allow for the handling of complex constraints and variables, including capacity, time windows, and vehicle availability. This flexibility empowers businesses to customize the API to their specific requirements, ensuring optimized routes tailored to their unique operational needs.
Step-by-Step Integration of Nextbillion.ai’s Route Optimization API
Integrating Nextbillion.ai’s Route Optimization API into a NodeJS application enables businesses to harness the power of advanced route optimization algorithms. In this section, we will provide step-by-step instructions for integrating the API into a NodeJS application, discuss API endpoints, authentication and explain how to make API calls to optimize routes based on service requests and generate optimized schedules.
Explore NextBillion.ai’s Route Optimization API
Prerequisites
Creating a NodeJS Field Service Management (FSM) software and integrating the Route Optimization API requires a few prerequisites to ensure a smooth development process. Here are the key prerequisites:
- Node.js Environment: Ensure you have Node.js installed on your system. You can download and install Node.js from the official Node.js website (https://nodejs.org/).
- JavaScript Proficiency: A strong foundation in JavaScript is crucial as NodeJS is a JavaScript library. Ensure you have a good grasp of core JavaScript concepts, such as variables, functions, arrays, objects, and asynchronous operations (promises, async/await).
- API Key and Access: Obtain an API key from Nextbillion.ai by signing up on our website. The API key is necessary for authentication and authorization to access the Route Optimization API.
- Understanding of RESTful APIs: Familiarize yourself with the concepts of RESTful APIs, HTTP methods (GET, POST, etc.), request/response formats (JSON or XML), and API authentication (using API keys or tokens).
Setup
Set up a NodeJS project for Field Service management software. Here’s a step-by-step guide to get you started:
1. Create a Project Directory: Create a new directory for your Node.js project. This will be the root directory of your project, where all the code and configuration files will reside.
2. Initialize the Project: Open a terminal or command prompt, navigate to the project directory, and run the following command to initialize the project and create a `package.json` file:
npm initThe npm init command will prompt you to provide information about your project, such as the project name, version, description, entry point, author, etc. You can either provide the details interactively or use the -y flag to accept the default values for all prompts.
3. Install Dependencies: If your project requires external libraries or packages, you can install them using npm. For example, to install Express, a popular Node.js web framework, run the following command:
npm install expressThis will download and install the Express package and its dependencies in the `node_modules` directory.
Add API Key to Project
To add an API key to your Node.js project, you can use the dotenv package to manage environment variables. Here’s a step-by-step guide on how to do it:
Step 1: Install the `dotenv` package In your Node.js project, open the terminal or command prompt and run the following command to install the dotenv package:
npm install dotenvStep 2: Create a `.env` file: In the root directory of your project, create a new file named .env. This file will store your API key and other sensitive information. Make sure not to share this file publicly or commit it to version control (e.g., Git).
Step 3: Add your API key to the .env file: Open the .env file with a text editor and add your API key in the following format:
API_KEY=your_api_keyReplace ‘your_api_key’ with actual API key.
Step 4: Load the environment variables in your Node.js application: In your Node.js application’s entry point (e.g., index.js or app.js), add the following code at the beginning of the file:
require('dotenv').config();
// Your Node.js application code goes here...
The require(‘dotenv’).config() line loads the environment variables from the .env file and makes them accessible in your Node.js application.
Step 5: Access the API key in your code You can now access the API key in your code using the process.env object. For example:
const apiKey = process.env.API_KEY;Remember to use the exact variable name API_KEY as defined in the .env file.
That’s it! Your Node.js application can now use the API key securely without exposing it in your codebase or sharing it publicly.
Add CSS file in NodeJS Project
To add a CSS file in a Node.js project, you can follow these steps:
- Create a new CSS file: Create a new file with a .css extension and give it a meaningful name, such as styles.css. You can create this file in the root of your project or within a specific folder, depending on your project structure and preferences.
- Define styles in the CSS file: Open the newly created styles.css file and add your CSS styles. For example:
/* styles.css */

body {
  font-family: Arial, sans-serif;
  background-color: #f5f5f5;
}

.container {
  max-width: 1200px;
  margin: 0 auto;
  padding: 20px;
}

.heading {
  font-size: 24px;
  color: #333;
}

.button {
  display: inline-block;
  padding: 10px 20px;
  background-color: #007bff;
  color: #fff;
  border: none;
  cursor: pointer;
}
Link the CSS file to HTML or templates: To apply the styles defined in your styles.css file, you need to link it to your HTML files or templates. You can do this by adding a <link> tag in the <head> section of your HTML file. For example:
<!-- index.html -->

<!DOCTYPE html>
<html>
<head>
  <meta charset="UTF-8">
  <title>My Node.js App<//title>
  <link rel="stylesheet" href="/styles.css">
</head>
<body>
  <!-- Your HTML content here -->
</body>
</html>
Serve static files with Node.js: To make sure that the CSS file is accessible to the client-side, you need to serve it as a static file. In a Node.js project, you can use a middleware like express.static to serve static files. Install Express (if you haven’t already) and use it to serve the CSS file:
npm install expressIn your Node.js app file (e.g., app.js or server.js), add the following code:
const express = require('express');
const app = express();

// Serve static files from the "public" folder
app.use(express.static('public'));

// Start the server
const port = 3000;
app.listen(port, () => {
  console.log(`Server is running on http://localhost:${port}`);
});
Import Axios Library
Install the Axios library, a popular HTTP client for making API requests, by running the command:
npm install axios
Make an Optimization POST Request
Create a new file named `postRequest.js` in your Node.js project’s root or in a designated folder, such as `src`.
To configure the API endpoint and make a POST request with the given data in a Node.js project, you can use the axios library to make the API call. Here’s how you can do it:
const axios = require('axios');

//Retrieve the API key from the environment variable
const apiKey = process.env.API_KEY;

// Function to make the POST request to the API endpoint
async function postDataToAPI() {
  try {
    // Prepare the API endpoint with the API key
    const apiEndpoint = `https://api.nextbillion.io/optimise-mvrp?key=${apiKey}`;

    // Data to be sent in the request body
    const data = {
      locations: {
        id: 2,
        location:
          '1.29360227,103.80828989|1.29360227,103.8273062|1.30227739,103.84595327|1.31482858,103.84503015|1.31925839,103.86312334|1.3248957169,103.8285176106|1.2996042263,103.8112802999|1.2830643677,103.8343527086|1.2856021297,103.8384649827',
      },
      description: 'Test shipments',
      jobs: [
        {
          id: 8,
          location_index: 0,
          service: 300,
          delivery: [1],
          setup: 200,
          pickup: [1],
          time_windows: [[1656327600, 1656342000]],
        },
        {
          id: 9,
          location_index: 1,
          service: 300,
          delivery: [1],
          pickup: [1],
          time_windows: [[1656327600, 1656332000]],
        },
        {
          id: 100,
          location_index: 3,
          service: 300,
          delivery: [1],
          pickup: [1],
          time_windows: [[1656327600, 1656362000]],
        },
      ],
      vehicles: [
        {
          id: 1,
          start_index: 3,
          end_index: 3,
          capacity: [46],
          time_window: [1656327600, 1656372000],
          skills: [2, 3],
        },
        {
          id: 2,
          start_index: 1,
          end_index: 1,
          capacity: [46],
          time_window: [1656327600, 1656352000],
        },
      ],
      shipments: [
        {
          pickup: {
            id: 1,
            service: 300,
            location_index: 6,
            time_windows: [[1656329600, 1656342000]],
          },
          delivery: {
            id: 1,
            service: 300,
            location_index: 3,
            time_windows: [[1656339600, 1656352000]],
          },
          amount: [5],
          skills: [2],
          priority: 100,
        },
      ],
    };

    // Make the POST request to the API
    const response = await axios.post(apiEndpoint, data);

    // Handle the API response
    console.log('API Response:', response.data);
  } catch (error) {
    // Handle any errors that occur during the API request
    console.error('Error calling API:', error.message);
  }
}

// Call the function to make the API call
postDataToAPI();
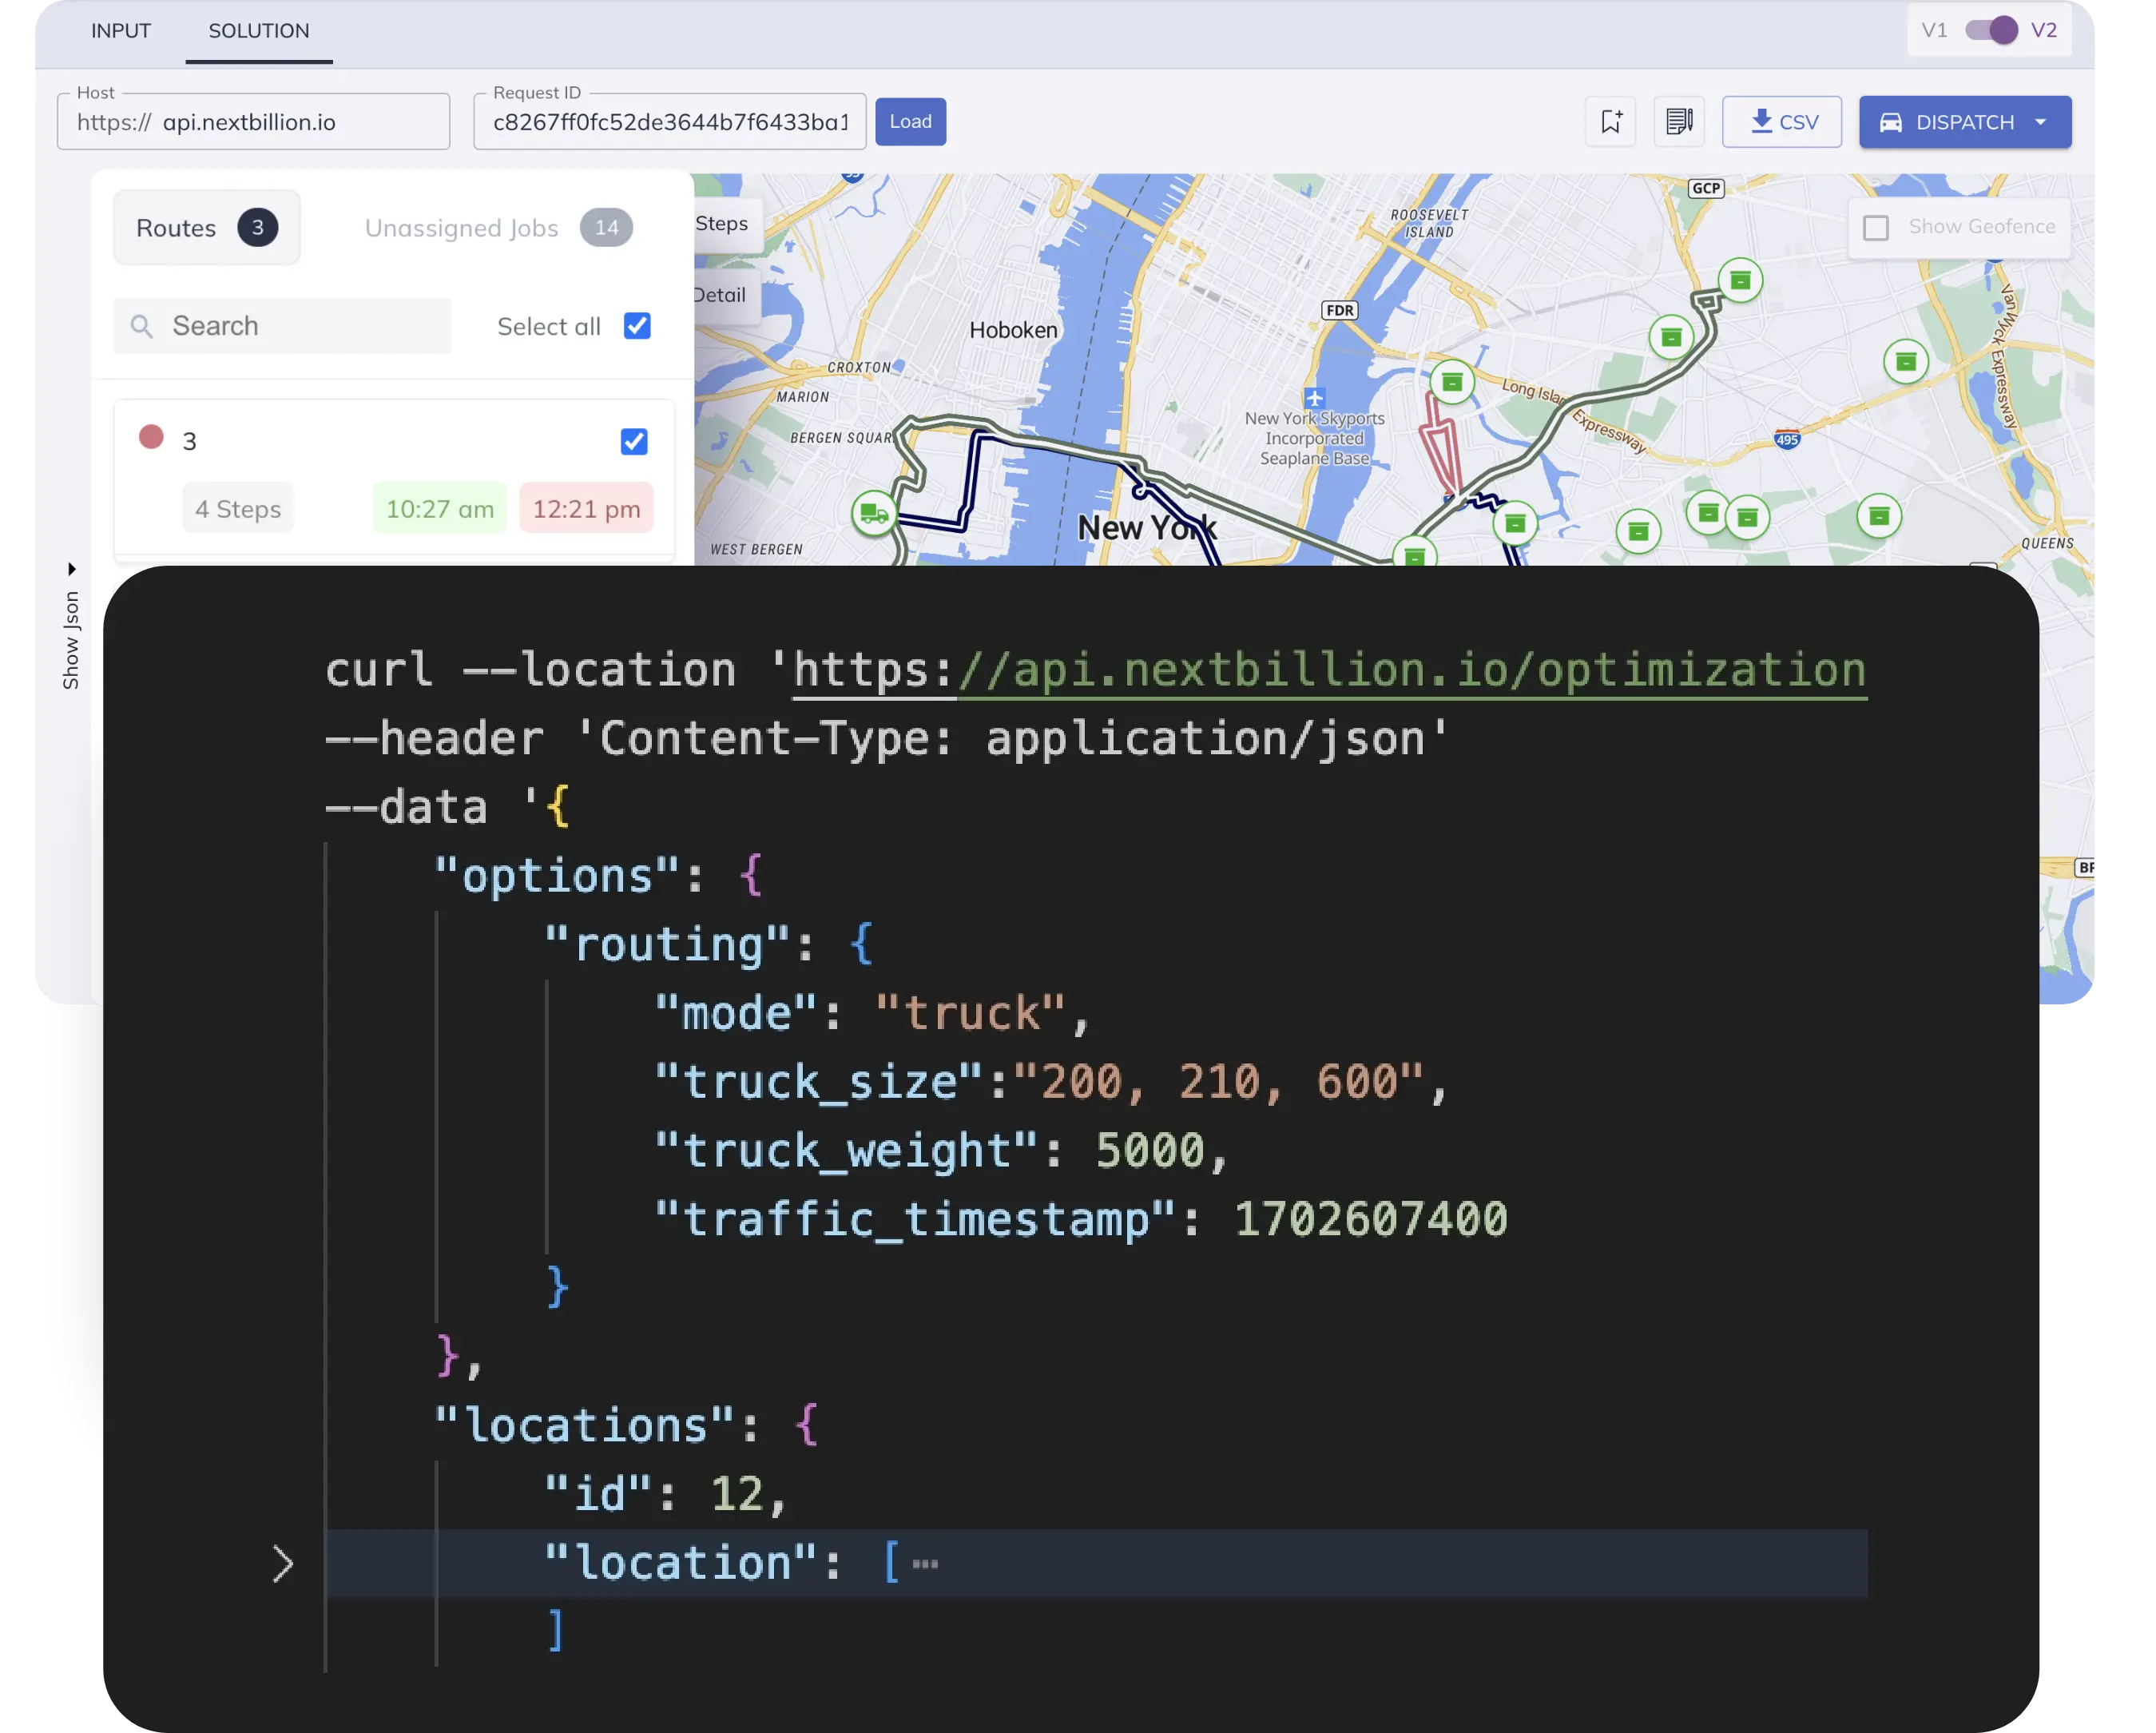
In this code, we use the axios library to make a POST request to the API endpoint https://api.nextbillion.io/optimise-mvrp?key=&{apiKey}, where `apiKey` is the placeholder for your actual NextBillion.ai API key. The data to be sent in the request body is provided in the data object.
When the API call is successful, the response from the API will be logged to the console. If any error occurs during the API request, the error message will be logged to the console as well.
Retrieve the Optimized Solution with Optimization GET
Here’s how you can configure the API endpoint and make a GET request to retrieve the optimized route result in a Node.js project:
const axios = require('axios');

//Retrieve the API key from the environment variable
const apiKey = process.env.API_KEY;

// Function to retrieve the optimized route result
async function getOptimizedRouteResult(uniqueJobId) {
  try {
    // Prepare the API endpoint with the API key and uniqueJobId parameter
    const apiEndpoint = `https://api.nextbillion.io/optimise-mvrp/result?key=${apiKey}&id=${uniqueJobId}`;

    // Make the GET request to the API
    const response = await axios.get(apiEndpoint);

    // Handle the API response
    if (response.data.status === 'Ok') {
      const optimizedRouteResult = response.data.data;
      console.log('Optimized Route Result:', optimizedRouteResult);
      // Process the optimized route result as needed
    } else {
      console.log('Error retrieving optimized route result:', response.data.status);
    }
  } catch (error) {
    console.error('An error occurred:', error.message);
  }
}

// Call the function to retrieve the optimized route result
// Replace 'UNIQUE_JOB_ID' with the actual unique job ID received after making the POST request
getOptimizedRouteResult('UNIQUE_JOB_ID');
In this code, the `getOptimizedRouteResult` function is defined to make a GET request to the specified API endpoint, using the provided API key and the unique job ID obtained from the previous POST request. The function will handle the API response and log the optimized route result to the console. You can further process the result based on your application’s requirements.
Displaying Optimized Routes Result
To display the optimized route result in a Node.js project, you can use a simple Express.js server and a front-end framework like EJS for rendering the result on a web page. Here’s how you can do it:
1. Install the required dependencies: Make sure you have Node.js and npm installed. Create a new Node.js project and install the following dependencies:
npm init -y
npm install express ejs axios
2. Create the server and route: Create an app.js file in your project directory with the following code:
const express = require('express');
const axios = require('axios');

const app = express();
const port = 3000;

//Retrieve the API key from the environment variable
const apiKey = process.env.API_KEY;

app.set('view engine', 'ejs');

// Function to retrieve the optimized route result
async function getOptimizedRouteResult(uniqueJobId) {
  try {
    const apiEndpoint = `https://api.nextbillion.io/optimise-mvrp/result?key=${apiKey}&id=${uniqueJobId}`;
    const response = await axios.get(apiEndpoint);
    return response.data.data;
  } catch (error) {
    console.error('An error occurred:', error.message);
    return null;
  }
}

app.get('/', async (req, res) => {
  try {
    // Replace 'UNIQUE_JOB_ID' with the actual unique job ID received after making the POST request
    const uniqueJobId = 'UNIQUE_JOB_ID';
    const optimizedRouteResult = await getOptimizedRouteResult(uniqueJobId);
    res.render('index', { optimizedRouteResult });
  } catch (error) {
    console.error('An error occurred:', error.message);
    res.status(500).send('Internal Server Error');
  }
});

app.listen(port, () => {
  console.log(`Server is running on http://localhost:${port}`);
});
3. Create the EJS template: Create a new folder named views in your project directory. Inside the views folder, create a file named index.ejs with the following code:
<!DOCTYPE html>
<html>
<head>
 <title>Optimized Route Result</title>
</head>
<body>
  <h1>Optimized Route Result</h1>
  <% if (optimizedRouteResult) { %>
    <pre><%= JSON.stringify(optimizedRouteResult, null, 2) %></pre>
  <% } else { %>
    <p>No optimized route result found.</p>
  <% } %>
</body>
</html>
4. Run the server: Start the server by running the following command:
node app.js
5. View the optimized route result: Visit http://localhost:3000 in your web browser. The optimized route result, if available, will be displayed on the page. If the result is not available or there is an error, you will see a message indicating so.

Integrating the Nextbillion.ai Route Optimization API into a NodeJS application offers businesses a powerful tool to optimize routes and generate efficient schedules. By following the step-by-step instructions provided above, developers can seamlessly integrate the API, configure API endpoints and authentication and make API calls to optimize routes based on service requests.
Leveraging the optimized solution, businesses can improve operational efficiency, reduce costs, and provide timely and accurate services. By combining the strengths of NodeJS and the Nextbillion.ai Route Optimization API, businesses can unlock substantial benefits and gain a competitive edge in their field service operations.
Ready to get started?
Request a DemoTable of Contents
Subscribe to our Newsletters
Get the best practices for route planning & optimization, delivered to your inbox.
Subscribe